Designing for Additive Manufacturing
Over the last six months, RAM3D have seen an unprecedented increase in both large and small companies interested in trying 3D metal printing as an alternative to other forms of manufacturing. This is possibly because they have had time to work on projects during the COVID-19 lockdown.
RAM3D works closely with their clients offering them advice on how to alter the part’s design to make the part stronger, lighter, and therefore cost competitive using dedicated design for production, using additive manufacture.
When designing a part for metal 3D printing, the biggest thing to consider is the material properties of the part you want to 3D print; if the mass doesn’t need to be there, get rid of it!
Traditional manufacturing and design methods tend to be constrained by tool paths, machine time, material shapes and sizes. This means, if you can’t remove the material, it stays there. With AM you are less tied to these constraints allowing you to do cut outs, pockets, fillets, undercuts and even combine part assemblies, where traditionally you couldn’t.

Some CAD programs even contain part optimisation for additive parts. This is a great way of reducing the part cost, while creating innovative and interesting looking parts.
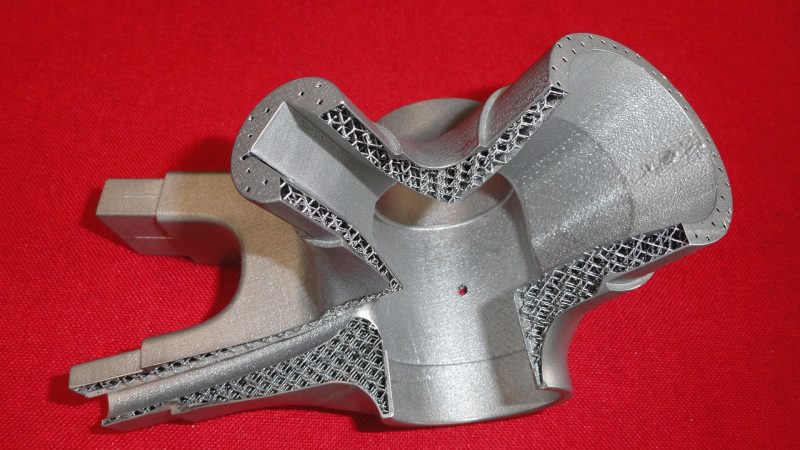
Where you cannot remove large surface areas or you need to keep a solid look to a part, there is the option of adding an internal lattice structure.
Lattice Structures
One of best ways to reduce mass without reducing too much structural integrity, is to add a lattice structure. The benefit of using a lattice over simply hollowing a part, is the lattice does not require internal support. When designed correctly, it can maintain good strength and performance.
RAM3D can create a simple uniform wall thickness internal lattice structure using their Netfabb build software. This is great for those non-structural parts where you need the mass removed but need to maintain that solid look.
For more structural parts, where a uniform wall thickness does not suit (where you have threads, structural ribs or require post machining), RAM3D require separate internal and external models.
They require two solid models; one of the main body and one of the internal body, that is going to be turned into lattice.
The internal body needs to be modelled to allow for the thickened or internal features. This is then subtracted from the outer solid model via a Boolean op leaving a cavity. Holes will then be added to the shell for powder removal. The internal solid model is then turned into a lattice structure in their Netfabb build software and merged with the outer shell creating the complete part.
Their clients can supply the main outer shelled part with various thickened features as well as specific openings for powder removal. They still require the solid internal model to form the lattice.
When providing parts for latticing, models must line up perfectly, so base both models off the same part where possible. A quick tip is to have both models labelled to differentiate between internal/lattice and outer/shell.
RAM3D require a 3D CAD file to print your part. And here are some of the types of files they can work with:
- A Solidworks file.
- A generic model such as a Parasolid, iges or step file. These are 3D CAD formats that can be shared between many different CAD programs.
- A good quality STL file. This type of file contains a description of thousands of small triangles that define the shape of your part.
Your 3D design questions answered
How does the engineer know when to use Metal 3D printing?
The answer is surprisingly simple…When you get the part that you want for the right price….
What types of parts are cheap to metal 3D print?
A simple bracket for example might be very cheap to make using conventional manufacturing but to make the same bracket in metal 3D printing could be expensive. On the other hand, if you have a part that is very complex in geometry, expensive to machine and limited in its design by the existing manufacturing method, this is a prime candidate for 3D printing.
What is the cost of metal 3D printing?
The pricing structure for RAM3D metal printing is a simple one. Most of the cost is directly related to the volume of the part. The volume determines the amount of metal you get and the amount of time it takes to melt that material. That cost remains mostly constant regardless of the geometric complexity. For example, a simple bracket of 30,000 cubic mm costs the same to print as a geometrically complex, hollow shelled nozzle of the same volume. If those two were made conventionally then the bracket might be a few dollars, while the nozzle might be hundreds of dollars.
In 3D printing we call that “Complexity for Free”. Meaning that if you have a part to print, you can add all sorts of geometric complexity for free if the part volume remains the same. If the part volume drops then it is often cheaper.


